프로젝트 환경설정 2
2022, Apr 24
프로젝트 환경 설정 2
View 환경설정
Welcome Page 만들기
<!DOCTYPE HTML>
<html>
<head>
 <title>Hello</title>
 <meta http-equiv="Content-Type" content="text/html; charset=UTF-8" />
</head>
<body>
Hello
<a href="/hello">hello</a>
</body>
</html
- 스프링 부트가 제공하는 Welcome Page 기능
- static/index.html 을 올려두면 Welcome page 기능을 제공한다.
- https://docs.spring.io/spring-boot/docs/2.3.1.RELEASE/reference/html/spring-boot- features.html#boot-features-spring-mvc-welcome-page
- thymeleaf 템플릿 엔진
- thymeleaf 공식 사이트: https://www.thymeleaf.org/
- 스프링 공식 튜토리얼: https://spring.io/guides/gs/serving-web-content/
- 스프링부트 메뉴얼: https://docs.spring.io/spring-boot/docs/2.3.1.RELEASE/reference/ html/spring-boot-features.html#boot-features-spring-mvc-template-engines
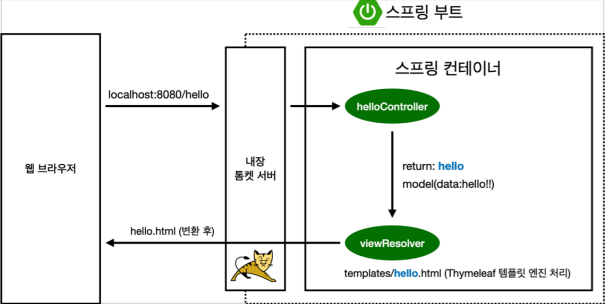
동작 환경 그림

- 컨트롤러에서 리턴 값으로 문자를 반환하면 뷰 리졸버( viewResolver )가 화면을 찾아서 처리한다.
- 스프링 부트 템플릿엔진 기본 viewName 매핑
- resources:templates/ +{ViewName}+ .html
참고: spring-boot-devtools 라이브러리를 추가하면, html 파일을 컴파일만 해주면 서버 재시작 없이 View 파일 변경이 가능하다. intellij 컴파일 방법: 메뉴 build → Recompile
빌드하고 실행하기
서버를 배포할 때 아래 jar 파일을 복사해서 넣어준 후 java -jar로 실행시키면 된다.
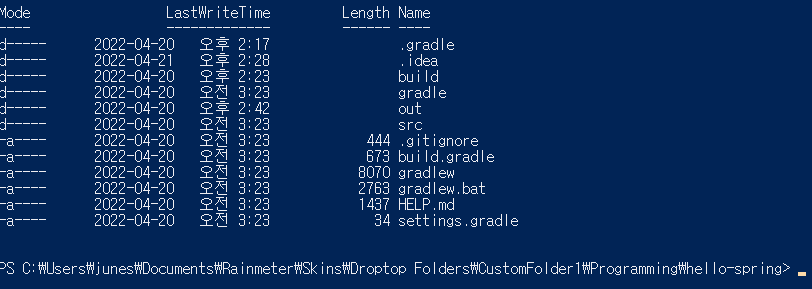
- 프로그램이 들어있는 폴더까지 접근

- ./gradlew clean build 입력

build 폴더 생성
- java -jar .\hello-spring-0.0.1-SNAPSHOT.jar

spring을 powershell에서 실행시키기